


Hey there, young woodworker! Ever wondered how to cut your wood without wasting a single piece? This Cut List Optimizer is like a magic helper in the workshop.
It plans the best way to slice your lumber into the sizes you need, like for a toy box or a shelf, using the board feet measure—144 cubic inches, or a block one foot by one foot by one inch.
It looks at the rough wood you buy and figures out how to use it all up with fewer scraps. No easy math trick here, it’s smart thinking that fits pieces together like a puzzle.
This tool saves you money and keeps your project neat. It works with board feet, the way lumber yards count, so you can plan your cuts just right!
Cut List Optimizer for Kerf & Grain Surfaces
The Formula This Calculator Uses
This tool doesn’t have one simple math rule. It uses clever steps called linear programming and bin packing to find the best cuts. Here’s how it thinks:
- It takes your stock lumber size (in board feet) and the pieces you need.
- It tries lots of ways to fit them, picking the one with the least waste.
For board feet: 1 Bd. Ft. = (Thickness in inches × Width in inches × Length in feet) ÷ 12 Then it adjusts cuts to match stock, minimizing leftovers. It’s like packing a lunchbox full without extra space!
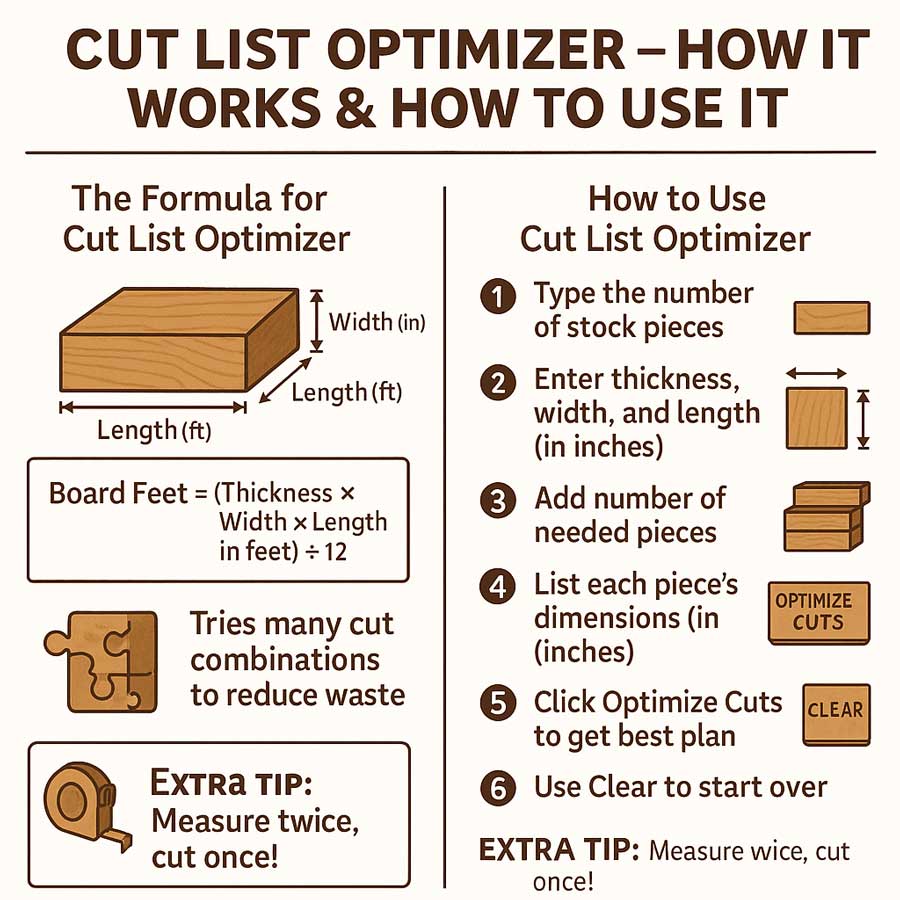
How to Use the Cut List Optimizer
Get your tape measure and let’s start cutting smart. Follow these steps:
- Type the number of stock pieces you have.
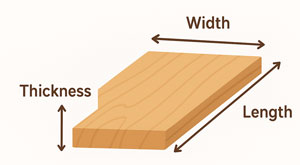
- Enter the thickness, width, and length of your rough lumber in inches.
- Add the number of pieces you need for your project.
- List each piece’s thickness, width, and length in inches.
- Hit Optimize Cuts to see the best cutting plan in board feet.
- Check the picture on the right to see how to measure your wood.
- Use Clear to start over if you need to change things.
Keep your tape straight and measure twice. This will help you cut your wood like a pro!
Here’s the straight talk from a shop vet who’s made every mistake once.
I’ve built cabinets and furniture for years. A cut list optimizer has saved me sheets of plywood and plenty of headaches. Once, I mis-cut one panel by 1/8". That single slip cost me a $60 sheet. After I switched to an optimizer, I stopped playing Tetris on scrap paper and started getting clean layouts every time.
Before we dive in—do you usually work in inches or millimeters? And are you cutting sheets, boards, or metal stock? It helps shape the setup.
- How does a cut list optimizer work?
- Straight answer: It takes your part sizes and your stock sizes, then lays out the best cutting pattern to use the least material and the fewest cuts.
- Details:
- You enter parts (length, width, quantity) and stock (sheet/board sizes).
- You set blade kerf, grain direction, rotation allowed, and edge banding if any.
- The software runs an algorithm (like bin packing/guillotine nesting) to place parts.
- It returns cut diagrams, a cut order, waste area, and leftover sizes you can save.
- What is the first thing that should be on a cut list?
- Straight answer: Start every row with a clear Part Name/ID.
- Details:
- “Left side panel,” “Shelf A,” “Back rail” beats a list of bare numbers.
- At the top of the page, note material, thickness, and kerf so nothing gets mixed.
- How accurate are cut list optimizers?
- Straight answer: Very accurate if your inputs are correct and your saw is tuned.
- Details:
- The math is tight; errors usually come from bad measurements, wrong kerf, or a dull blade.
- Expect shop accuracy around ±1 mm (±1/32") with good setup.
- Versus hand layouts, optimizers often improve yield by 5–20%, project depending.
- Why is a cut list important?
- Straight answer: It prevents wrong cuts, saves money, and speeds up the build.
- Details:
- You buy the right amount of material.
- You keep grain and pairs matched.
- You cut once, not twice.
- Can a CutList optimizer reduce material waste?
- Straight answer: Yes—often by a lot.
- Details:
- It nests parts tightly and shares kerfs where possible.
- It suggests the best cut order so small pieces don’t become unusable offcuts.
- You also get trackable leftovers with exact sizes for the next job.
- How does an optimizer work? (under the hood)
- Straight answer: It solves a packing puzzle with your rules and finds a near‑optimal layout fast.
- Details:
- It uses heuristics and dynamic programming built for 1D (bars), 2D (sheets), or mixed cutting.
- It respects constraints: grain, rotation, margins, edge banding, minimum piece size, and saw type.
- What are the components of a cutting list?
- Straight answer: Part name, quantity, finished size, material, thickness, notes.
- Details (typical columns):
- Part ID/Name
- Qty
- Thickness
- Length x Width (finished)
- Material/Species/Grade
- Grain direction
- Edge banding or over/under-size allowance
- Notes (bevels, dados, joinery)
- Group or cabinet/room tag
- How do you optimize a cutting list for material usage?
- Straight answer: Standardize sizes, protect grain rules, and let the optimizer nest parts; then tweak.
- Steps:
- Group by material and thickness.
- Keep common widths the same so rips can be shared.
- Allow rotation only where grain doesn’t matter.
- Cut big parts first, then small.
- Enter real kerf and a trim allowance for factory edges.
- Save usable offcuts with labeled sizes.
- What is the first thing to do when you get a cut? (shop first aid)
- Straight answer: Apply direct pressure, then clean under running water.
- Details:
- Press with a clean cloth until bleeding slows.
- Rinse with clean water; mild soap around the wound.
- Don’t pour alcohol or peroxide inside deep cuts—they can damage tissue.
- Cover with a sterile bandage.
- Seek care if bleeding won’t stop after 10 minutes, the cut is deep/gaping, or you need stitches. Check your tetanus status.
- How do you input dimensions into a CutList optimizer?
- Straight answer: Pick units, enter stock sizes, set kerf and rules, then add all parts with quantities.
- Steps:
- Choose inches or mm.
- Add stock: sheet size (e.g., 96 x 48) or board lengths.
- Enter kerf (e.g., 1/8") and trim margins.
- Mark grain direction and if rotation is allowed.
- Enter each part: L x W x Qty (finished size). Add edge banding and over/under-size if needed.
- Select the goal: least waste, fewest cuts, or best leftovers.
- Run, review layouts, adjust if you spot a grain or joinery issue.
- How much does a CutList optimizer cost?
- Straight answer: Options range from free tools to pro software that can cost hundreds or more.
- Typical ranges:
- Free: basic web apps, hobby use.
- Paid hobby/pro: $30–$150 one‑time or $5–$25/month.
- Cabinet/industrial suites: $300–$2,000+ or subscriptions $30–$100+/month. Nesting/CNC modules can cost more.
- Prices vary by features like labeling, CNC export, and reporting.
- How to cut more precisely?
- Straight answer: Measure once, mark smart, use stops, keep the saw tuned, and sneak up on final size.
- Tips that work:
- Use a sharp pencil or knife line. Read the same side of the mark.
- Set a stop block for repeat parts; don’t “eyeball” tape marks.
- Check blade square and fence parallel. Use a fresh, right‑tooth blade.
- Support the work. Clamp small pieces.
- Cut 1/32" proud, then trim to final size.
- Make a test cut in scrap, then run the batch.
- Advantages of making an accurate cutting list
- Straight answer: Fewer mistakes, lower cost, faster builds, cleaner grain matches, safer shop time.
- More:
- Clear part counts and sizes.
- Better shopping list.
- Easy to hand off to a helper without confusion.
- What is a cutting list used for?
- Straight answer: It’s the plan that tells you what to cut and from what.
- Details:
- It connects the drawing to the saw.
- It tracks parts from rough stock to assembly.
- What are the pros and cons of cutting (in the shop)?
- Straight answer: Pros—custom sizes, clean fits, efficient builds.
Cons—risk of waste, time to set up, safety and tool wear. - More:
- Pros: exact parts, less sanding/fitting, lighter final pieces when you remove extra stock.
- Cons: wrong cuts are hard to undo; dust, noise, blade costs; need for good layout.
Everyday example
Think of a pizza night. Your “parts” are the slices, and your “stock” is the full pizza. An optimizer is the friend who knows how to slice so everyone gets a fair piece, the toppings line up, and nothing falls off the edge. You waste less and feed the whole table.