Whether you are a food lover or a hobbyist who has found a new interest in wood, or even just someone who is bored out of their mind. This super fun DIY step by step guide on how to make a wooden bowl will help you in making a cute little wooden bowl for your workspace or kitchen! So, make sure you give special attention to the details and materials because this is going to be a long ride!
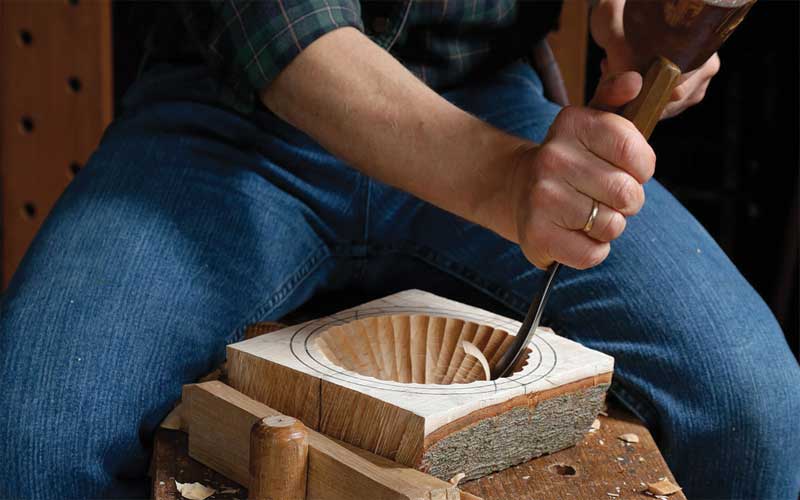
Table of Contents
Tools used in wooden bowls
The checklist that I will be giving you below will have the minimum and the most necessary tools that you will need in order to start working on your wooden bowl. So, if you are looking for the most basic what you need list, then here it is! Make sure you don’t skip anything!
- Full face shields
- Safety glasses
- Bowl gouge
- Parting tool
- Respirator
- Respirator filters
- Wood bowl blank
- Pencil
- Straight edge
- Compass
- Faceplate (comes with the lathe)
- Band-saw
- Faceplate screws
- Wood finish
- Impact driver with the screwdriver bit
How to Make a Wooden Bowl
With the tool checklist ticked off. Now, it’s time to get down and start practical work and finally turn your wood into a bowl! I have made a brief step by step guide that will help you in making a very decent bowl that you can use in your practical and daily life.
If you have already gone through a step or know about it, feel free to skip to the next step!
Making Wooden Bowl : Step by Step Guide
1. Centering the bowl blank
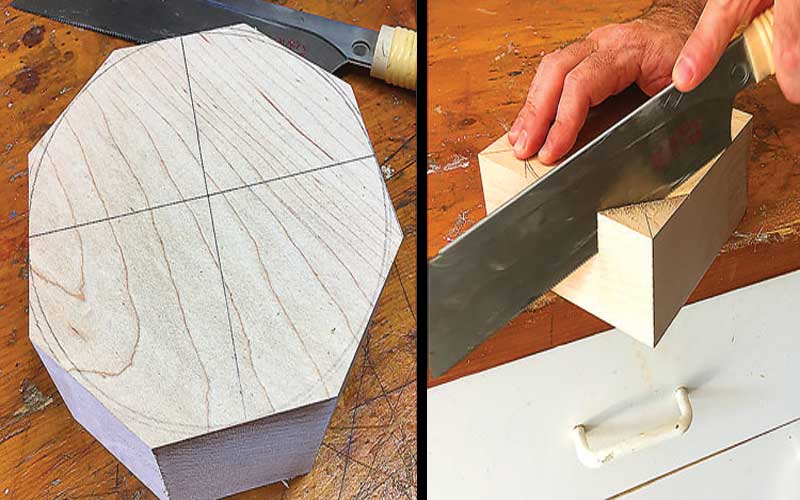
To get started, we first have to find the center of the bowl blank. If you have a square bowl blank, use a straight edge and draw two pencil lines each from the opposite corners of the blank. You can easily mark an x in the center of the bowl, then use a compass, place the pointed leg of the compass on the x or the center point, and then draw a circle all the way around.
If the compass successfully completes a whole circle, then congratulations, but if one edge of the side is short, then place the compass once again on the shortest side of your bowl and re-draw the circle.
Also see: Best Wood for Carving
2. Prepare your bowl blank
Once you have marked your bowl, it is then time to cut off the excess wood so that you can easily work without any delays. For this part, you will need a band-saw; make sure you follow the safety guides before using the band-saw. In case you don’t have a band-saw, you can use a hand pull saw; it will help you trim away most of the excess material easily, leaving your wood blank with an octagonal shape.
3. From Face-plate to Bowl Blank
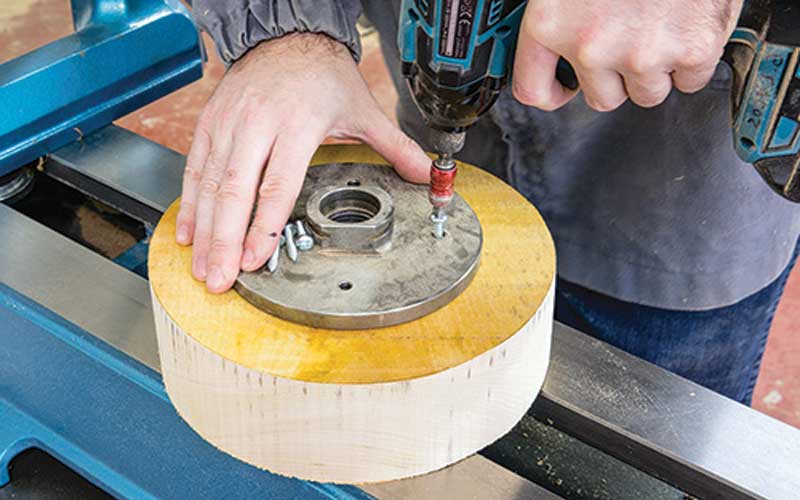
Although there are originally many ways that you can mount a bowl blank to the lathe, for this time, we will be using a faceplate to do so since the faceplate is one of the most secure ways to mount your bowl blanks.
- Make sure the faceplates flat surface is smooth and has no blemishes
- Only use faceplate screws as other screws like drywall screws are not build to handle a lathe.
- The screws should fit perfectly in the faceplate holes.
Carefully put the faceplate over the center mark of the bowl blank with the help of a drill that is equipped with a driver’s head to match the screws you are using. Start at one screw but don’t fully tighten it. Insert the second screw opposite to the first one, and then keep doing this routine with all the other screws. Once all the screws are in, you can now finally tighten them.
Read Also: Best Wood for Dremel Carving
4. Mounting
With the faceplate now firmly attached to the bowl blank, it is now time to move forward to the lathe.
Put your safety gear on, and before turning your lathe on, make sure it is on a low speed first. Once you turn on the lathe, observe that the bowl blank is turning freely without any resistance. By bringing the live tailstock center up and setting it with the lathe on, make sure the center is assured once again. Once that’s done, tighten and lock the tailstock.
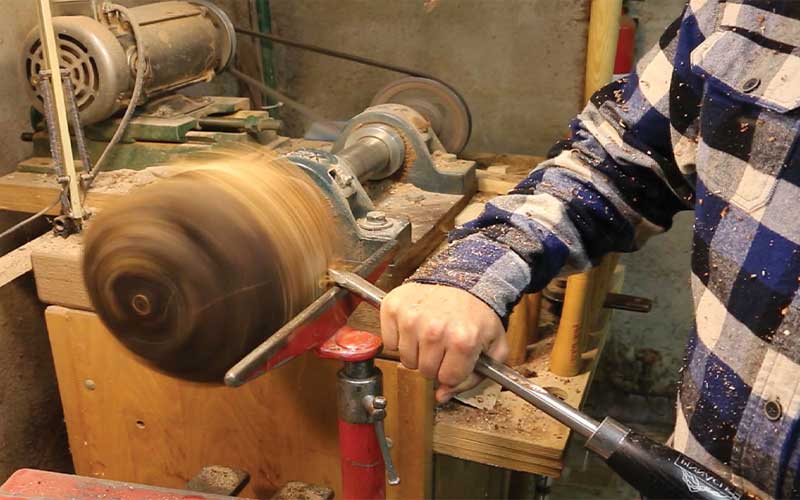
5. Turning
For this step, you will need a bowl gouge, or if you don’t have a bowl gouge, you can also use a woodturner, so similar results. Note that turning wooden bowl is done at a slower speed as respective to other wooden turning processes. Anchor your bowl gouge on the tool rest, then line it up and make it parallel to the bowl blank.
Once you have the bevel pointing away and parallel to the turning bowl blank, make a slow pass along the edges of the tool rest.
In the first few passes, you might not cut any wood, but with time you will start to hear a clicking sound of the wood being cut. Carefully keep turning your blank on a band saw, and only after a few turns will you have a perfectly round bowl blank surface!
Most Important: Best Dremel for Wood Carving
6. Squaring the bottom
Using the same technique from step 5, we will now smooth the bottom surface of the bowl. There are high chances that the bottom might be already smooth, but just to be completely sure, we will make a few light touches on the surface.
Positioning the left hand to guide the right hand to line up the “away pointing gouge” with the bevel parallel with the blank bowl bottom. Again, make several light passes until you feel like the blank is now completely smooth and flat.
Read: Best Wood for Carving Spoons
7. Mortise work
We will start cutting mortise using a parting tool. We will be using the parting tool more as a scraper. Position the parting tool in a way that the cutting tools are on the centreline. With the lathe on and up-to-speed, position the parting tool on the tool rest first. Then slowly insert the parting tool inside of the mortise measurement. Note that the four-jaw chuck grip will not work if the mortise is made too deep. Make sure you make the inside of the mortise area as smooth as possible.
Another thing is that with a properly cut dove-tail, the four-jaw chuck will hold incredibly secure. You can make an undercut dovetail with the help of a skew chisel angle. After you have gone through all these parts, make sure the four-jaw chuck dovetail side matches will with the mortise; if it does, you have completed this part!
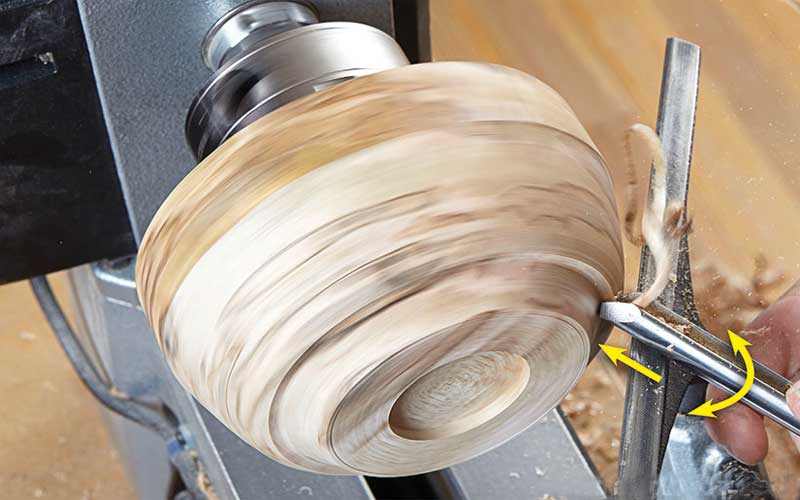
8. Shaping the bowl
This is the stage where all the magic happens and where you bring out your inner craft-men that were so excited from the beginning.
Remember how till this point, we have been positioning the tool rest parallel to the bowl surface? Now we will position the tool rest to be parallel to the shape that will be created, not the current surface. Working from left to right, we will be making push cuts to clear away the waste material so that your beautiful bowl can come forward from underneath.
The position of the bowl gouge needs to be away from you, and so should the flute. This should be at about 10 o’clock position. Make small cuts initially until you reach the curve of the bowl’s exterior. Once you are making the final passes, make sure to sharp your finishing bowl gouge once again to make the surface a lot smoother.
Once all your bowl is curved just outside the mortise opening to the top outer rim, this step is complete.
9. Giving the final depth

Firstly, we have to work on the rim and give it a shape. You can actually shape your rim however you like, but I would suggest you work with a wood bowl gouge on its 3 o’clock position. Once the gouge is on the 3 o’clock side, line the bevel up to where the cut will be the tip of the gouge, and the bevel should be at an inward angle.
Make small passes until a clean rim is formed. Note the rim should be wide enough to accommodate the final wall thickness.
After we are done with the rim, we now have to clear the bowl from the inside. With the tool-rest parallel to the front of the bowl and the height set to the tool center, make small arcing passes to remove the material from inside of the bowl. Rotate your bowl gouge flute to the right from 2-3 o’clock. Keep scooping out small pieces of wood from the inside of the bowl; make sure you don’t overdo it, or you might cause a catch.
Finishing the inside of your bowl is really exciting as it means you are so close to getting your bowl done, but it also is the most difficult and the most careful part of the process.
Once you are down, giving your bowl the final depth, check to see if all the sides and the bottom thickness of your bowl are of the same width; if they are, then congratulations, you have outdone yourself and successfully completed this step!
10. Finishing the bowl
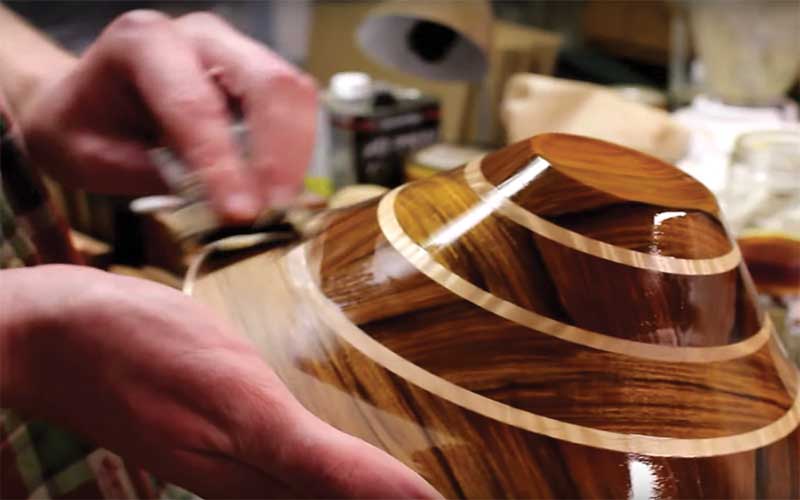
Don’t worry; sanding and giving a finishing touch to your bowl is a piece of cake after everything that you have successfully done. But before you go in on this part, make sure you put your respirator on so that you don’t have any breathing issues.
You don’t have to invest a lot of money in a power sanding setup just yet. You can easily use sandpaper to do this process. All you have to do is cut a small piece of the sanding paper and hold it to the rotating bowl on the lathe; you can precisely sand the bowl too with the lathe off if you want to. Stop sanding whenever you are satisfied with the result! Once you are done sanding, apply a very thin layer of the wood finish to your bowl and leave it to dry for 24 hours.
Leave a Reply