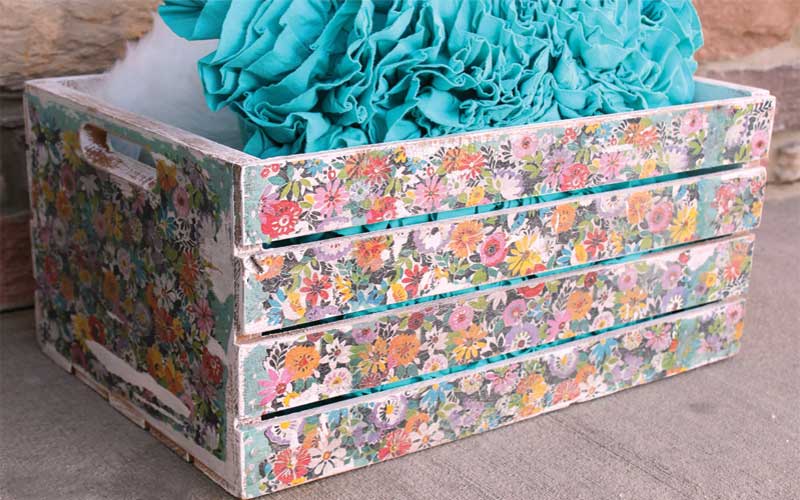
From boxes, trays, frames to vases and furniture, you can personalize and decorate almost anything with decoupage. Time for you to spice up your living space; create a delicate rustic look with the help of different vintage craft ideas incorporating this technique, or go for bright patterns.
For those of you who are new to this technique and are wondering what exactly is it that you are getting into, no need to worry because I will be explaining everything. Decoupage is a French word that means to “cut out.”
Generally speaking, this technique involves cutting out pictures, gluing them to an object, and finishing it off with layers of varnish. My favorite thing about decoupage is the amount of freedom it allows; you can opt for the most complex designs or stick to more minimal options.
The world is your oyster, and the supplies required are basics that are essentials at home, even if you don’t craft around much. This means that there’s no need to make trips to the craft store. Let’s get right down to business! So without further ado, it’s time to discuss in detail the do’s and don’ts as well as a step to step guide to make you a pro at decoupage and unleash your inner creativity!
Table of Contents
How to Decoupage on Wood?
Here’s a general guideline to decoupage on wood. I will be discussing how to prepare the wooden surface, the different supplies you will need, and the process involved in this section. Pay close attention to successful results, and don’t forget to have fun.
1. Preparation of Wood to Decoupage
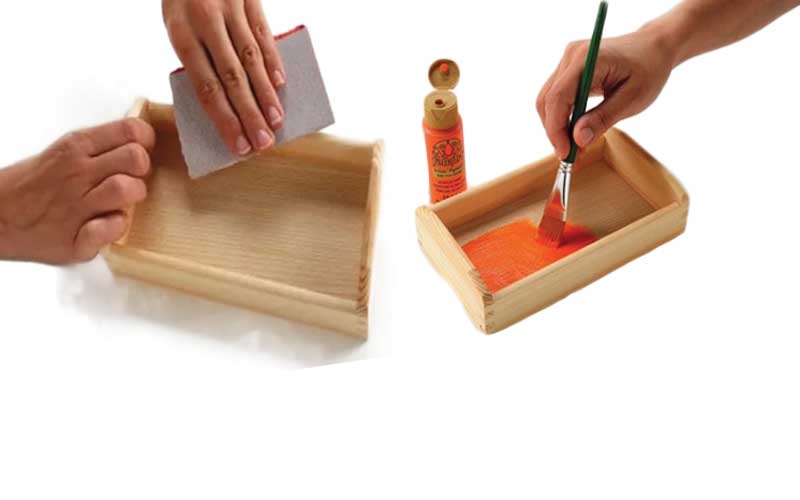
Getting the surface ready to decoupage anything onto wood properly requires preparation. The goal is to make the wooden surface as smooth as possible. Generally, it is more textured compared to plastics and glass. Keep in mind that it all depends on the type of wood being used, so you might have to do less or more work accordingly.
Sanding the Wooden Surface
Since you will be layering paper, fabric, or other materials on top of the wooden surface, the objective is to ensure that they are laid as flat as possible on the surface, devoid of any air bubbles. For this reason, sanding down the wooden surface is pertinent.
If you are planning to decoupage on furniture or older wood, using an electric sander is a better option, but a smaller surface can be sanded down with sandpaper effectively. Once you’re done with the sanding process, make certain that you wipe the surface down thoroughly as even a single speck of leftover particles will be problematic, ultimately affecting the finish of your project.
Painting the surface
The next step is to prime the wooden surface. To carry out this step, white paint is the ideal option. All you need is to add a layer of white paint after you have sanded and cleaned the surface. You can paint additional layers if your wood is of a darker shade.
If you don’t want to paint the surface, you can skip this step but be vary that the grain of your wood will be visible in this case. Other colors of paint can also be used, but I recommend white as I believe that it just adds a more crisp and clean look.
Read about the tools: Best Dremel for Wood Carving
2. Choosing the different materials to decoupage on wood
This step gives you all the liberty to express your craftsmanship. But you will have to be wary of some materials as decoupage is not as simple as paper crafts, especially when applied on wood. Now I will be discussing the different materials and supplies that are absolute winners and options that you want to avoid for a 100% success rate.
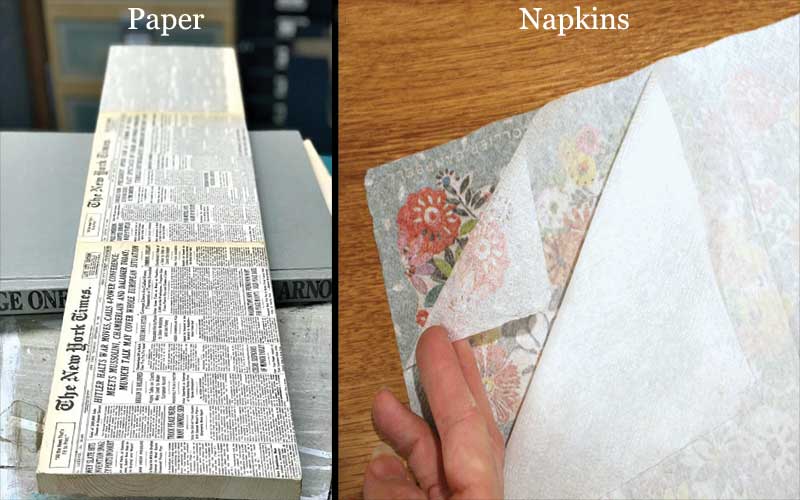
Napkins
You can’t go wrong with fabric. The reason why I am such a strong proponent of using fabric is that it is a much thicker material as opposed to options like tissue paper, so you don’t have to deal with wear and tear problems.
The trick is to increase the number of coats as well as the amount used for each layer of mod podge, so it’s soaked all the way through. Fabrics such as Cotton, Lace, Knit Fabric, Old Table Cloths, Satins, and Silks are amazing to work with.
Paper
Using paper onto wood is a much more common option because of just how easy and quick it is. Pay close attention to the type of paper and mod podge being used as you will get different results from tissue paper and wrapping paper.
The ink on the paper is also another key consideration as some types can bleed or may require a longer period of drying time. Pick from a variety of issue paper, scrapbook paper, wrapping paper, laser-printed photos, newspaper, magazines to form the most unique and beautiful designs.
3. The Different Types of Mod Podge Used for Decoupage on Wood
You should pick the type of mod podge depending on the use as well as what item you plan to decoupage. Make sure you read the labels and information given on the glue to see if it has the right qualities.
As a point of reference, I recommend using an outdoor mod podge for a porch chair as it will be able to stand the test of weather and sun much better, whereas a hard coat mod podge is my go-to for indoor items. The reason why mod podge is most preferable over other glues is that it has all three functions: gluing, sealing, and finishing that is needed for decoupage.
Here are some of the different varieties of mod podge you can choose from:
- Matte: If you want to have a flat finish, you should look for mod podge options that have a matte finish. This type of adhesive is perfect for decoupage with napkins or scrapbook paper on wood.
- Satin: While it is similar to the matte option, it is most suitable for decoupage on furniture for a painted effect.
- Glossy: Are you looking for a shiny final look? Opt for a mod podge with a glossy finish. This is the ultimate choice for photo transfer decoupage.
Read the guide: How to Make Rustic Wood Signs
Step to Step Guide on How to Decoupage on Wood
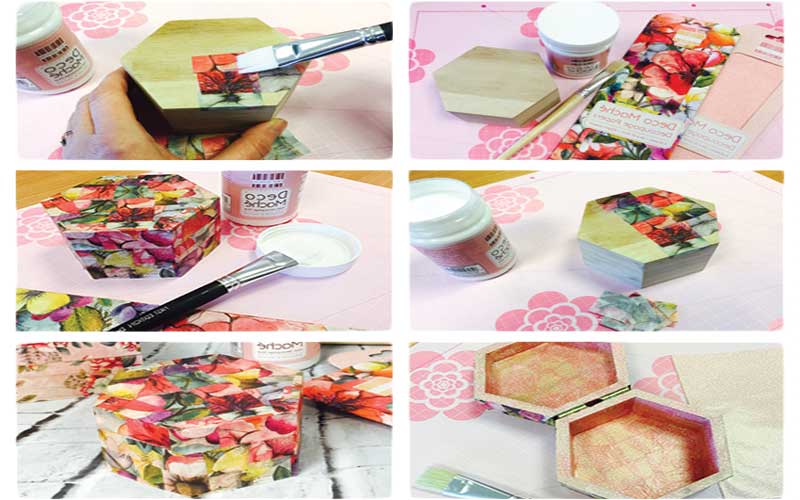
As promised, here are the general steps for decoupage on wood:
Supplies needed:
- Scissors and craft knife(Needed for cutting out different designs and patterns)
- Sponge/cloth (for cleaning the surface or excess glue)
- Sandpaper (to smoothen the wooden surface)
- Cotton wool buds (to wipe away excess glue)
- Mod podge
Guide for carving: How to Carve Wood for Beginners
Steps:
1) After conducting the steps discussed above for preparing your wooden surface, apply a base coat of mod podge of your choice.
2) Measure the paper or fabric according to the area and design you want and mark it.
3) Cut the design out with the help of scissors or a craft knife.
4) Next, you need to place your cutout on top of the wooden surface. Remove the air bubbles with the help of a flat edge or roller. You can even use your credit card to get the job done.
5) Now, you need to wait to allow the layer of glue to dry. This is very important as the waiting will ensure that your cut out doesn’t rise up as the layers of mod podge are piled on. Once the glue has dried up, proceed by applying a layer of mod podge of your choice on the top.
6) Finish by adding extra layers of mod podge once the initial coat has dried up. A quick tip is to add extra coats for better protection, especially if the project is to be kept outdoors, will be used often, or is placed in an area with a lot of activity. You should do at least five coats.
7) It is recommended to apply a coat of clear acrylic finish over your last coat of mod podge. Even though I have never had any issues with removing the tackiness, this step will guarantee that you face no such problems.
8) Once the finish has dried up, your project is complete and ready to be displayed. Make sure to show off the rewards of all your hard work and patience. For maintenance, you don’t need to carry out any special techniques. Instead, all you need to do is use a microfiber cloth to dust of any dirt occasionally, just like you do with your regular furniture.
Conclusion
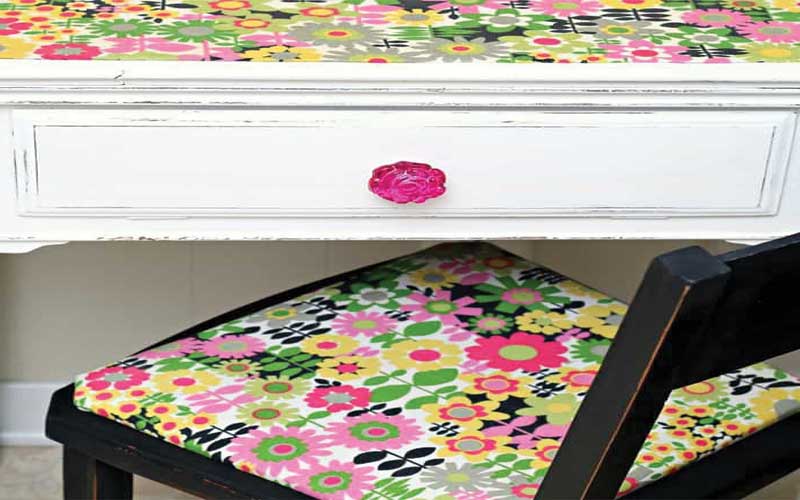
Remember that the process can be easily applied to the wood, so whether it is furniture, frames, ornaments, or trinket boxes, you just learned a new way to redecorate and revamp them.
Now you can use scrapbook paper, napkins, photographs, magazine cutouts, and even your drawings to create new and exciting designs sustainably. Just follow the steps mentioned above and improvise with the amount of glue used as well as the number of coats.
I hope you found this article helpful in your quest for learning how to decoupage successfully! Remember to have fun and be as creative as possible because, speaking from experience, it’s when you have a good time you get the most exquisite results.
I find this information very helpful, going to try this on three vintage outdoor pieces..I have regular decoupge paper… Thank you so much!